Showing posts with label appetizer. Show all posts

Thursday, May 8, 2014

Butternut Squash, Blue Cheese, and Bacon Pizza


Pizza Dough nutrition data at Calorie Count

 My rule about making things from scratch or buying them is very simple.  Can I make this better than I can buy it?  Yes or no.  For pizza dough (and in fact for most yeast dough) my answer is NO.  Maybe I have no patience or maybe I'm not a very dedicated measure-er or for whatever reason I've never really gotten the hang of yeast dough.  Luckily, my local chain grocery store understands.  In the deli section with the pre-made macaroni salads and things I would never normally buy, they sell balls of frozen pizza dough that are all ready to go.
If I want to make a pizza tomorrow, I set it out the night before in the fridge and I am ready to go.  If you are more capable than I (which is likely), obviously you could make your own dough.  For me, the real star of this dish is not the dough at all.  The dough is just the simple receptacle that I use to shovel as much of this amazing pizza into my gut as possible.  I adore the salty bacon, creamy and smooth squash, and sharp blue cheese together with the sweet onions and the egg gives it that final, over-the-top quality that we all need sometimes.  This originated as a "what are we going to eat tonight" type recipe from many random things leftover in the fridge/freezer.  I love it so much and will be making it again soon.
Butternut Squash, Blue Cheese, and Bacon Pizza (makes one small pizza for two)
Ingredients:
6 pieces of bacon
1 cup frozen, cubed butternut squash
1 medium onion
pizza dough
1/4 cup blue cheese crumbles
2 eggs
olive oil
salt and pepper

1.  Set pizza dough in an oiled bowl, cover with a kitchen towel, and allow to rise according to the instructions.
2.  In a large frying pan, heat 1 Tbs. olive oil over medium-high heat.  Coarsely chop the bacon into pieces and add to the hot pan.  Cook for 5-7 minutes until the bacon is just beginning to get crispy.
3.  For the onions, I usually do a coarse chop, but for this recipe I want the pretty, half moon slices so that the onion is more part of the show.  Slice onion in half and then slice each half to make uniform,half moon slices.  Add to the pan with bacon along with the butternut squash.  Cook for another 5 minutes until the onions are tender, the squash begins to caramelize and the bacon is crispy.
4.  When you are about ready to make the pizzas, preheat your oven to 500 degrees.  Leave one large cookie sheet in the oven to get hot while it is preheating.
5.  On a floured board, roll out the dough to about 1/4 inch thickness.  It doesn't need to be a perfect circle.
6.  When the oven is preheated you are going to work quickly to assemble the pizzas on the hot pan.  Remove the hot pan from the oven and place the dough on top of the pan.
7.  Drizzle the dough with about 1 Tbs. olive oil.  Then sprinkle the bacon, squash, onion mixture evenly over the pizza dough.  Leave two "wells" or spaces for the eggs.  Crack the eggs and set the raw egg into the wells.
8.  Sprinkle the blue cheese over the whole pizza evenly and place the pan back into the oven.
9.  Cook for 10-15 minutes until your dough is browned and the eggs are just set.
If you can, allow to cool for 2-3 minutes before slicing.
Devour!
One Year Ago: Blood Orange Salmon
Two Years Ago: Vegetable Fried Rice
Three Years Ago: Roasted Chiopino

Thursday, May 1, 2014

Rosemary Parmesan Cookies

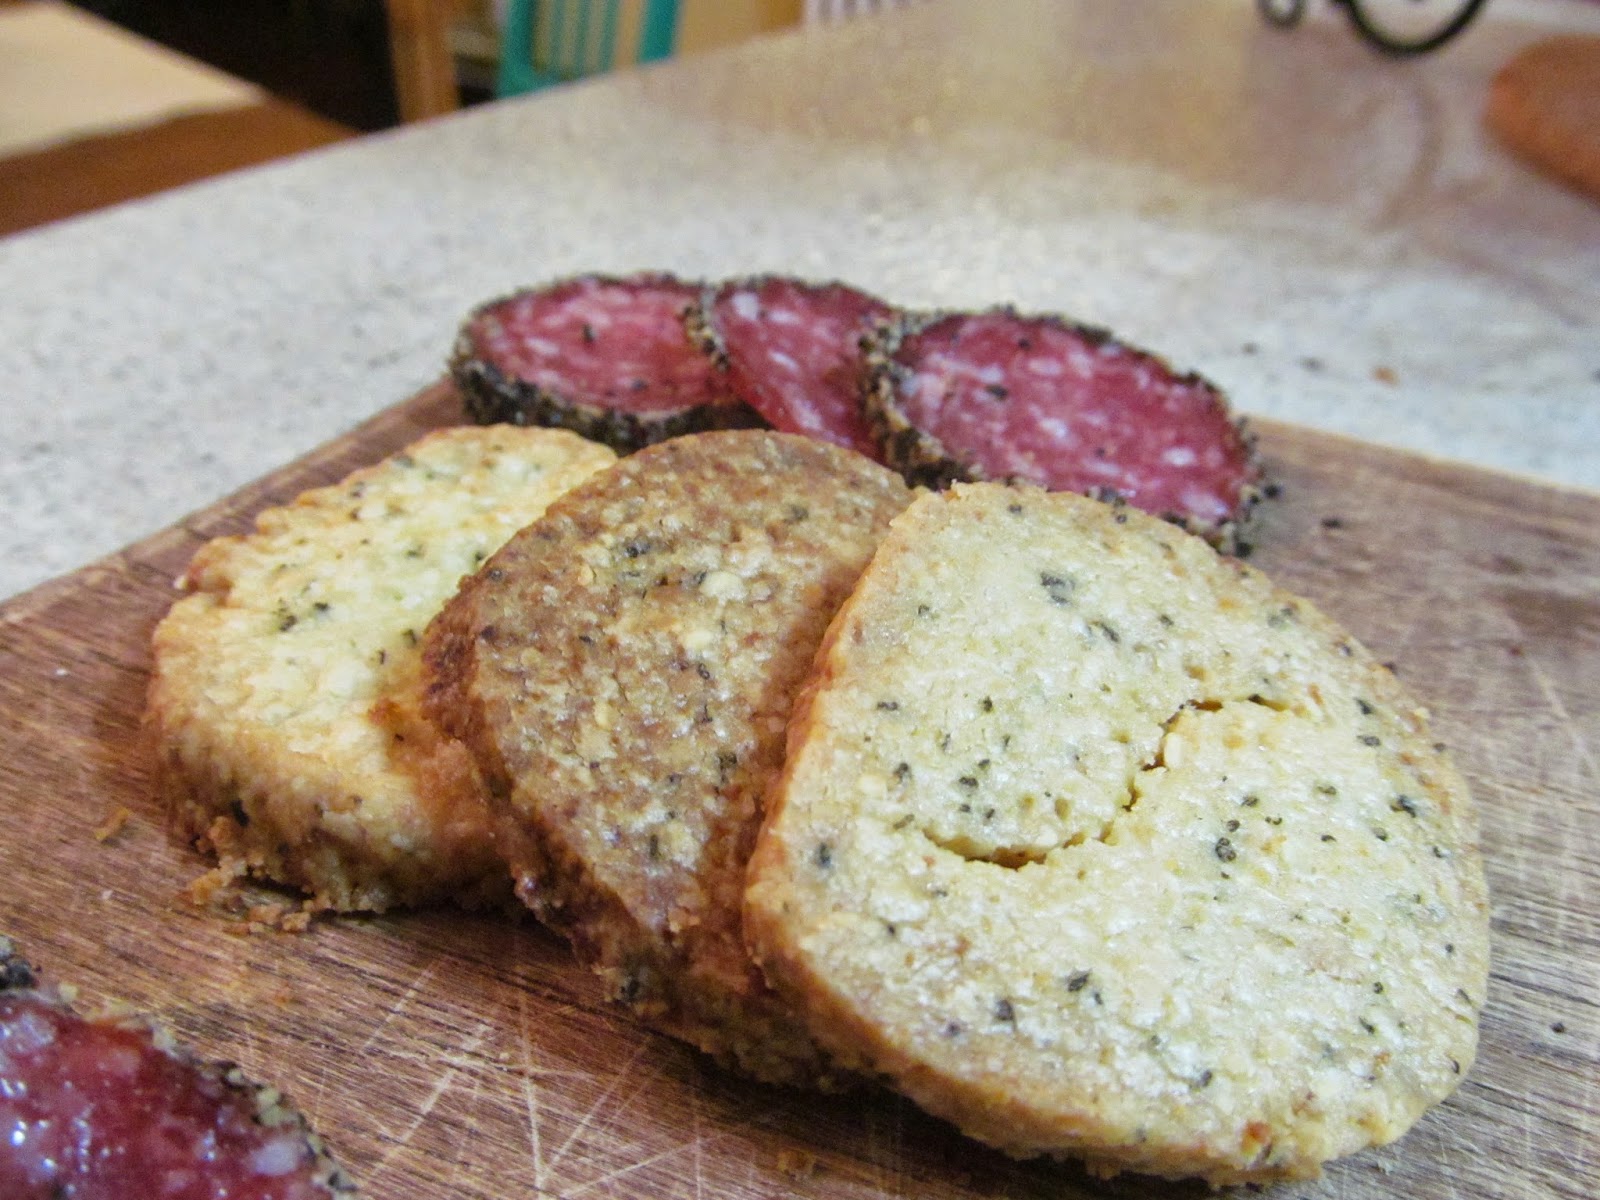
These cookies are sinfully delicious. They are so crumbly and buttery that they practically melt in your mouth. Now you may be wondering...savory cookies?  Yes - but they aren't for dessert.  They are the perfect make-ahead appetizer.  Set out these cheesy, herby cookies and your guests can nibble away while they are sipping a cocktail and getting ready for the main event.  Think of them as an elegant alternative to a cheese platter.  I make up a batch for a girls night dinner party and they were a big hit.  Aside from them being mouth wateringly addictive, all I had to do was set them on a platter with cocktail napkins and a chilled bottle of champagne.  Appetizers done.  Then I could actually sit with my friends and enjoy spending time with them, rather than fretting over whether the appetizers were hot enough or too cold or sitting out too long.  Plus, they aren't filling so I don't have to worry about people loading up on cheese, meat, and olives, and then being too full to really enjoy dinner.  I highly recommend these little beauties for your next dinner party.
Rosemary Parmesan Cookies (adapted from a recipe by Dorie Greenspan)
Ingredients:
1/2 cup slivered almonds
3 Tbs. sugar
2 Tbs. fresh rosemary
2 cups flour
1/3 cup Parmesan cheese
1/2 tsp. salt
2 sticks cold unsalted butter, diced
2 large egg yolks, beaten

1. Preheat the oven to 350°. Spread the almonds in a pie plate and toast for about 10 minutes, until golden. Turn off the oven and let the almonds cool.
2. Finely chop the rosemary and combine with the sugar in a small bowl.  Stir them around for a bit with a spoon.  Apparently this releases the oils in the rosemary and makes the flavor that much better.
3.  In a food processor, combine the rosemary sugar with the almonds, flour, cheese and salt.  Pulse until the almonds are coarsely chopped.
Add the butter and pulse until the mixture resembles a coarse meal. Add the egg yolks and pulse until large clumps of dough form. 
4. Lay plastic wrap out onto a board and dump the mixture on top the plastic wrap.  The mixture is very crumbly, but don't panic.  You don't want to work it too much, but as best you can, form it into dough.
5.  Using the plastic wrap to help you, roll into a 1/2 inch log and wrap tightly with plastic wrap.  set the logs in the freezer for 1 hour or up to overnight.
4. When you are ready to bake, preheat the oven to 350°.  With a sharp knife, slice the frozen logs into 1/4 inch pieces to form your cookies.  Arrange the cookies about 1 inch apart on lined baking sheets.
5. Bake the cookies for about 20 minutes, until lightly golden.  Let the cookies cool on the baking sheets for 3 minutes, then transfer them to a wire rack to cool completely.
Serve with cocktails or a crisp, sparkling wine.  I served them with spicy Soppressata and they were perfect together!


One Year Ago: Sausage and Pepper Sandwich
Two Years Ago: Blood Orange Chicken Wings
Three Years Ago: Buffalo Turkey Meatball Sandwiches

Monday, February 17, 2014

Espinacas Con Garbanzos

My friend Erin is in living in Barcelona (so jealous!) and is loving all the delicious Catalan foods that she is sampling over there.  Luckily, we get a little peak into her Barcelona kitchen to enjoy one of her favorite new recipes that she learned in Spain.  You can follow more about Erin's adventure on her blog paellasabbatical.tumblr.com.  Thanks, Erin!

Hola guapos! I'm Erin, DC area native and long time fan of CSK. (Emily, you are my Thanksgiving feast spirit guide.) I've been spending the last year in Barcelona, Spain, learning the language, culture and food. What I love so much about the food here is that the dishes are almost always simple and fresh. They have truly mastered how to bring out the best qualities of individual ingredients. The Mediterranean climate is perfect for growing most fruits and vegetables year round, which means the markets are always stocked with delicious, fresh and cheap produce.
This is my all time favorite place to buy my fruits & veggies. It's located about 50 meters from my front door, has great quality and is dirt cheap. You know a place is good when it is regularly swarmed with older Catalan ladies.
Santa Caterina market is one of the most famous in the city (2nd to La Boqueria) and is less than a five minute walk away. You can find just about anything you would want in here.
My preferred produce stand in Santa Caterina. If you are traveling to a European market that is frequented by tourists, go past the first few stalls and find the gems hidden in the middle and the back. They will be more affordable and frequented by the locals.
Here's the view from my kitchen. A faltering herb garden (hey, not bad for February) lots of trees, old buildings and a playground.

I present to you one of my favorite dishes, espinacas con garbanzos (spinach with chickpeas), which can be served tapas style over bread, as a side dish to grilled pork/fish/chicken, or on its own for a quick lunch. This particular recipe serves 6-8, so feel free to cut it in half as it does not taste quite as good leftover the next day.
Espinacas Con Garbanzos (Adapted from Jose Andres)
2 15oz cans of chickpeas, drained & rinsed
1/4 cup EVOO, then extra for drizzling
5 garlic cloves, peeled and whole
1 lb fresh spinach, washed and stems removed
Medium sized slice of hearty bread, crust removed
2 tablespoons paprika, I used the Smoked Spanish variety from Penzeys
1 teaspoon ground cumin
2 tablespoons red wine vinegar
Sea salt and ground pepper to taste
1.  Place chickpeas in a large stockpot, cover with cool water, just enough to cover them. Place on medium heat to warm up while you prepare the rest of the ingredients.
2. Heat 1/4 cup EVOO in a small skillet over medium heat. Brown the garlic cloves for 3 min, then set in a bowl. Brown the bread in the same skillet, 1 min each side.
Place the bread in the bowl with the garlic. Remove the skillet from heat, allow to cool for a few minutes.
This would be better with a mortar & pestle, but I had an ice cream scooper. Worked just fine. Expats gotta be resourceful.
3. Mash the bread & garlic for several minutes to make a thick paste. Add a bit of EVOO as needed to get the desired consistency.
4. Add paprika, cumin, vinegar to semi-cool skillet, mix and allow to sit
5. Bring chickpeas to a low boil. Add spinach, one handful at a time, pausing in between to press into the water. Simmer for 5 minutes.
6. Add paprika mixture and garlic/bread paste to chickpeas & spinach, creating a thick stewy sauce. Simmer for another 10 minutes, stirring occasionally mashing some of the chickpeas.
7. Add sea salt and pepper to taste
8. Serve immediately on slices of baguette, tapas style, or as a side dish to grilled fish, chicken or pork.

For more musings about expat life, feel free to check my blog: paellasabbatical.tumblr.com

Monday, September 30, 2013

Crispy Chicken Nuggets with Madrigal Dipping Sauces

It has been a busy few months in our house and sadly for the blog, we've had more things cooking off the stove than on. Many weddings, babies, and other fun things have kept me away FAR too long. I was scolded by a few friends and family this past week and knew I needed to come back, but I wasn't sure when or how.  Then it hit me.  The thing that brought me back was my deep and undying love for one of the greatest TV shows of all time: Breaking Bad.  We had a viewing party for the season finale yesterday with Friends of the Blog, Alex and Josh Bard along with their buddy Jeremy.  I tried to make all our favorite foods from the show to get us in the right mindset to watch.  The episode didn't disappoint and neither did the food.  These chicken nuggets were spectacular.  Extra crispy outside with tender and juicy meat inside.  This would be a healthier way to serve chicken nuggets to a fussy young eater and really all the adults loved them too.  I can't wait for another good excuse to make them.
Crispy Chicken Nuggets with Madrigal Dipping Sauces
Ingredients:
2 lbs. boneless, skinless chicken breasts
1 cup buttermilk
2 cups flour
1 Tbs. paprika
1 Tbs. onion powder
1 Tbs. garlic powder
1 Tbs. salt
1 tsp. chili powder
1 egg
1/4 cup milk
vegetable oil (for frying)

1.  Slice the chicken breasts into about 1-inch pieces.  Try to keep them fairly uniform in size, so they cook evenly.  Place chicken in a bag or Tupperware and marinate in 1 cup buttermilk for 4 hours or up to overnight.  The longer it marinates, the more juicy and tender the chicken will be.
2.  Prepare the dry coating by mixing all the dry ingredients in a large bowl.  Mix up the egg and milk in another bowl.
3. Dip the chicken pieces in the dry mix, then wet, then dry again for a double coated, extra crispy crust.  Set the coated chicken pieces on a tray and place in the fridge for 30 minutes.  This will help the coating dry and adhere to the chicken better when frying for a very crisp nugget.
4.  Heat the oil over medium heat in a dutch oven or cast iron skillet.  When hot, add chicken to pot.  Cook 3 minutes and flip the chicken.  Then another 3 minutes on the other side, for a total of 6 minutes.
Cook the chicken in batches, so you do not overcrowd the pan and cool the oil too much.  If the oil is too cold, you'll end up with greasy, soggy nuggets.  Patience is key here.
5.  Set the nuggets on a paper towel lined plate to drain some oil.

If you aren't ready to eat them right away, you can place them on a tray in a warm oven until ready to serve.
For the official Madrigal Dipping Sauces, we had Ketchup , Mesquite BBQ, Honey Mustard, Kickass Cajun, and of course...
FRANCH!  A winning combination of Ranch and French Dressings that the Madrigal staff concocted themselves.  It was delicious and I am surprised that it hasn't caught on nationwide yet.
Serve the nuggets with your dipping sauces and enjoy.
For other fun Breaking Bad inspired foods, we served Rooftop Pizza,
Crystal Blue Meth (aka. Blue Jello),
Funyuns (a Jessie Pinkman favorite),
Chocolate Chip Pancakes (for Walk Jr. Flynn.),
and, of course, no Breaking Bad party would ever be complete without Schraderbräu!