Friday, February 20, 2015

Hill Country Chili Cook-Off This Saturday, Feb. 21st 1-3pm

Mark, Alex, and I are headed over to Hill Country Barbecue Market tomorrow for their Second Annual Chili Cook-Off. We'll be defending our first place finish from last year! If you are in the DC area and enjoy delicious chili, drinking beer in the afternoon, and having it all benefit a great cause (Microgreens) then come on out tomorrow, Saturday Feb. 21st from 1-3pm to Hill Country in Gallery Place at 410 Seventh Street NW. Your $10 donation at the door gets you tasting tickets for all of the chili competitors (they were amazing last year) and you get the chance to vote for your favorite - impartially of course. I hope to see you all there!

In some highly comical news, even though I have a face for radio and a voice for herding cats, the very nice people over at Newschannel 8's Let's Talk Live invited me to make chili and talk about the event on Saturday.
 http://www.wjla.com/blogs/lets-talk-live/2015/02/chefs-face-off-at-the-hill-country-barbecue-market-chili-cook-off-24537.html
Needless to say, I won't be quitting my day job any time soon, but it was a fun morning. Chef Farber and the whole Hill Country crew were great and I'm looking forward to seeing everyone again at the contest this weekend. I was very nervous, but at least I had a cute apron (thanks dad!). They even put up the chili recipe. It is very easy to make, but it would just be easier to come over this Saturday 'cause I'm making it for you!
It was fun to see a little shout out to Corcoran Street! Best block in DC!! Best roomies in the world - Kelaine and Lizzie!!!!
But it just wasn't the same without my team members, Mark and Alex, rocking their aprons and making our team so beautiful. You eat with your eyes after all. Never fear, DC - they'll be with me on Saturday!
And just for fun...here's my post about the event last year!
_____________________________________________________________________________

I entered the Hill Country Chili Cook Off this weekend and...I won first place!!  So exciting.  I think it was due in equal parts to the fun chili and the gorgeous Alex and Mark in their revealing aprons.  Thanks for the Bard-deWolf bump, fellas!  All of the competitors had amazing chili.  I should know because I scarfed down so much.  We all had a blast and can't wait to defend our title next year!  Here's the recipe I used.

Chipotle Pumpkin Chicken Chili
Ingredients:
1 lb. ground chicken
1 onion
1 bell pepper (whatever color you like)
4 chipotle peppers in adobo
1 can sweet corn
1 can cannelini or navy beans
1 can diced tomatoes
1 can pumpkin puree
1 Tbs. sugar
1 beer (I usually use a lager, but I'm not above a PBR or a taste of the Rockies)
1 carton low sodium chicken stock
1/2 lime
salt and pepper
canola oil
Garnish:  Sour Cream, Monterrey Jack Cheese, diced avocado, crumbled Fritos, Lime Wedges, Chopped Cilantro
1.  Heat 2 Tbs. oil in a large, heavy bottom pot over medium high heat and add the chicken.  Sprinkle generously with salt and pepper and brown for 4-5 minutes.

2.  Chop onion and pepper and add to the chicken.  Sprinkle again with salt and pepper and continue to cook for another 3-4 minutes.
 (I made 5x the recipe for the competition and I STILL ran out in then end.  Oh well)

3.  Add the diced tomatoes with their juice and the drained corn and beans.  Stir until well distributed.

4.  Finely dice 4 chipotles (more if you are daring) and add them to the chili along with the beer and stock. and another sprinkle of salt.

5.  Add the can of pumpkin puree and sugar and stir until distributed into the chili.

6.  Bring it to a boil and turn down the heat to a simmer and allow to simmer for 45 minutes until the chili thickens and is totally delicious.  Taste and add more salt/sugar if needed.
(We could "plate" the chili for the judges and this was my "plating."  Things were too hectic and I didn't take a picture there, but the Hill Country people did, so I'll update when I have one.  So cute!)

7.  Add the juice of 1/2 a lime at the end for freshness and serve with your favorite garish.
Enjoy!

One Year Ago: Whiskey Balsamic Steak
Two Years Ago: Orange Curry Cous Cous
Three Years Ago: Cheddar Dill Scones

Monday, February 2, 2015

Mustard and Herb Crusted Salmon

Hello again. Remember me? I remember you! I've been very derelict in my blogging duties, but here goes nothing. Salmon is a major favorite in our house. We've actually been buying it from Costco in really big pieces, cutting those pieces into 4 hunks and wrapping them tight in plastic wrap to freeze. When we want salmon for dinner the next day, we pull out a pieces and presto-change-o, we are ready to bake it up. I find that baking salmon, and all fish really, helps to avoid the whole house fish stank that generally accompanies cooking fish on the stovetop. If you line you baking sheet with foil, bake the fish, and then discard the foil, the stink is greatly minimized. This particular salmon dish is a quick weeknighter that you can serve with rice and a salad or vegetable - my favorite being Josh's Chili Roasted Broccoli. It is a real pick-me-up in the winter and brings some freshness to your table while still being pretty seasonal. It would also be good doubled or triple with a whole side of salmon for a dinner party or the whole family.
Mustard and Herb Crusted Salmon (serves 2)
Ingredients:
2 filets of salmon (about 1/2 lb. total)
2 Tbs. mayonnaise
2 Tbs. Dijon mustard
1 Tbs. Whole Grain Mustard
1 Tbs. breadcrumbs (panko or regular)
1 tsp. chopped parsley
salt and pepper

1. Preheat your oven to 450 degrees. Mix together the crust for your salmon by chopping the parsley and mixing together the mayo with the mustards and breadcrumbs. Sprinkle with salt and pepper.
2. Line a baking sheet with foil and spray with non-stick spray or brush with olive oil. Sprinkle the salmon with salt and pepper on both sides and set it on your prepared baking sheet.
3. Top each piece liberally with your crust mixture and drizzle lightly with olive oil to form a nice crust.
4. Bake at 450 for 10-12 minutes (depending on thickness) until your salmon is cooked to you liking. I like mine to be a bit pink on the inside, which should be about 10 minutes.
Serve with your favorite sides and enjoy!

One Year Ago: Flo's Brown Sugar Bread Pudding
Two Years Ago: Grapefruit Pound Cake (VIDEO BLOG ALERT)
Three Years Ago: Grapefruit Honey Drinks

Thursday, January 29, 2015

Lizzie's Super Bowl Cupcakes

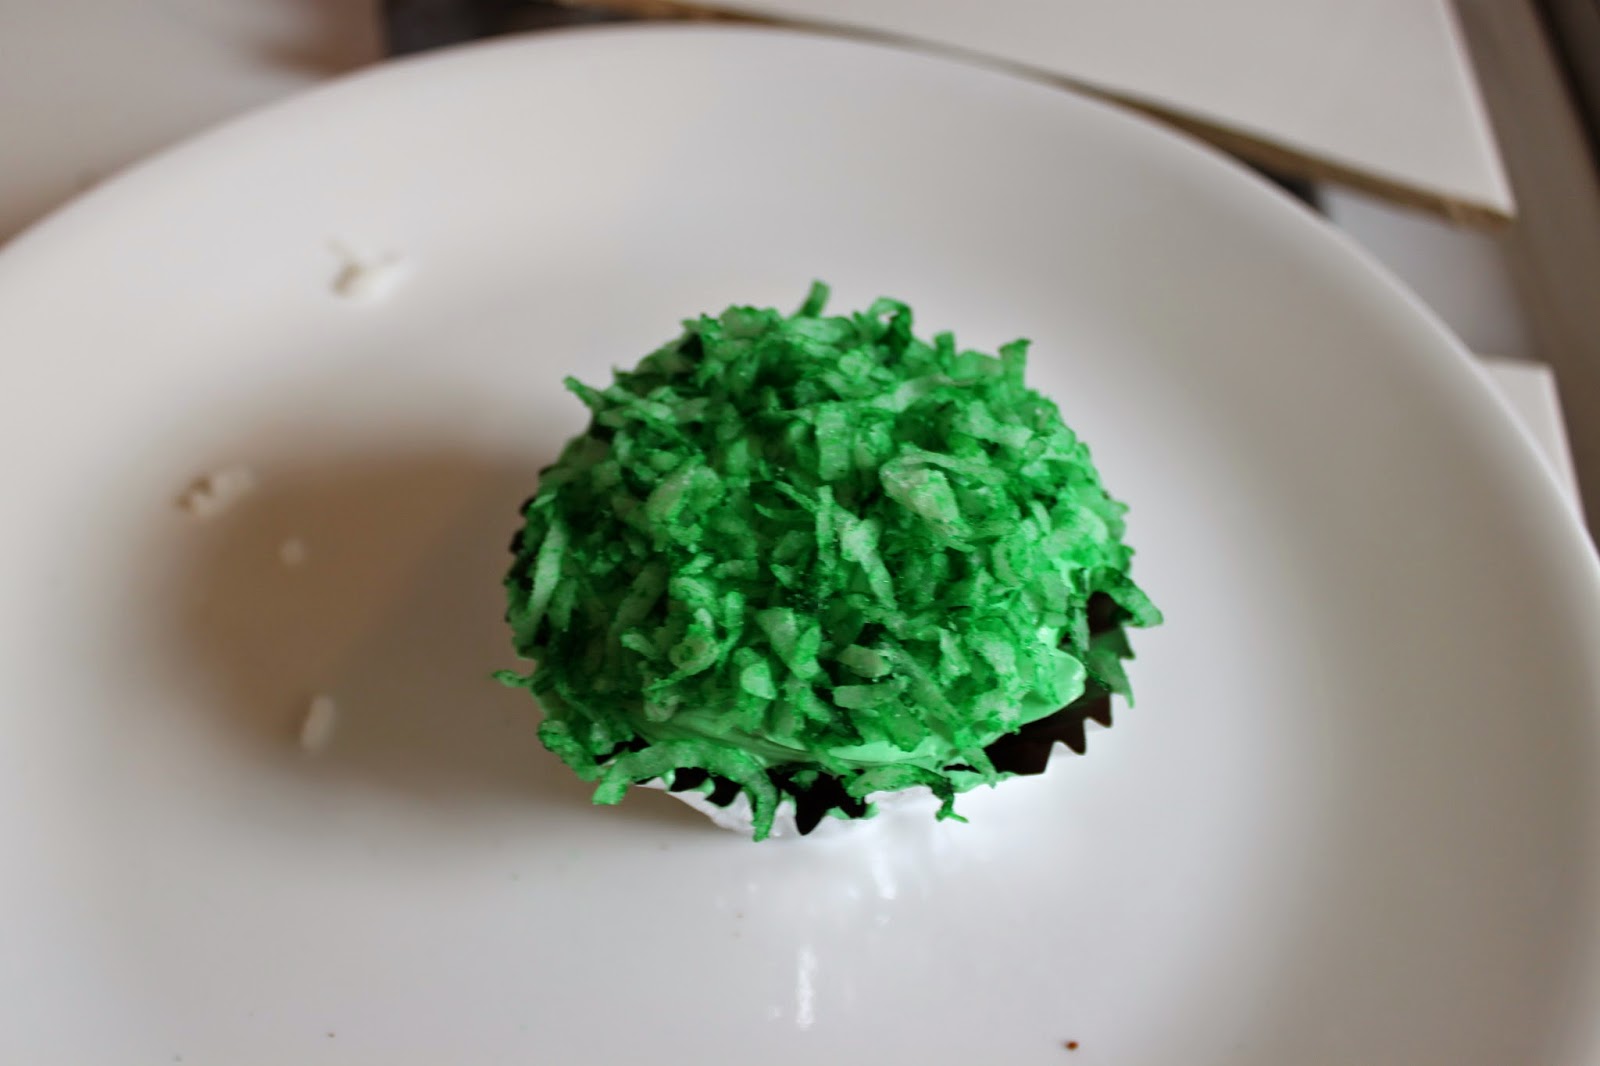
What is the most fabulous thing ever? Give up? Ok - it's my friend and the artist-formerly-known-as-my-roommate, Lizzie. Every time I reach for my toolbelt and fix a running toilet or patch a kick in the wall, I wish for simpler times when we lived together on Corcoran Street and our greatest worry was which bottle of sparkling wine to drink for with dinner. Rose? Yes please. Lizzie is not only a multiple Emmy award winning television producer, but she is also incredibly creative in the kitchen. She sent me the pictures and accompanying recipe for these cupcakes a LONG time ago, but they are perfectly timely for this weekend. LET'S Go any-team-that-is-not-the-Patriots!!

Lizzie's Super Bowl Cupcakes
Ingredients:
24 baking Cups
1 package chocolate cake mix
16 oz. white frosting
green food coloring
24 caramel candies
14 oz. bag shredded coconut
white icing in a tube with a very fine tip

1. Preheat your oven to as directed by your cake mix. Prepare cake mix, spoon into baking cups, and bake following package directions.
2. Tint frosting green
3. Place coconut in a bowl and tint green
                     
4. Once the cupcakes have cooled (about 10-15 mins), frost. Dip frosted cupcakes in the coconut; set aside
5. To make the footballs, line cookie sheet with wax paper so that you don't make a major mess.
6. Shape caramel candies into football shapes
7. Pipe thin lines on top of footballs as the strings (I dipped a toothpick into the icing and drew them on)
8. Let set in the fridge for 10 minutes.
9. Place the football in the coconut grass
Do not spike. Eat!

Monday, November 17, 2014

Thanksgiving 2014

After a months long hiatus and a new-found love of power tools has kept me from my kitchen, I figured it was only right to update before Thanksgiving with all of my favorite recipes for this grandest of eating days. This is a list of the fun CSK posts from over the past few years that should give you some inspiration for Thanksgiving. Most important...even though you are legally obligated to spend the day with your family, try to have fun!

Turkey:
Herb-Butter Rubbed Roasted Turkey

Starchy Sides:
Vegetables Sides:
Death by Chocolate (a great pie alternative for Chocolate lovers)

Drink:
I like to keep things simple with a crisp, acidic, dry white wine with Thanksgiving dinner.  Keeps me perky and happy through the whole ordeal.  Look for a Sauvignon Blanc or Chenin Blanc if you are feeling normal and a Viongier, steel aged Chardonnay, or Gewurztraminer if you are feeling feisty.  For those who like red, I also enjoy a nice, light Pinot Noir for the meal.

More importantly, I love to serve a bottle of Cava or some fruity, sparkling wine for appetizers.  It perks up the appetite and makes it feel like a special occasion.

Thursday, November 13, 2014

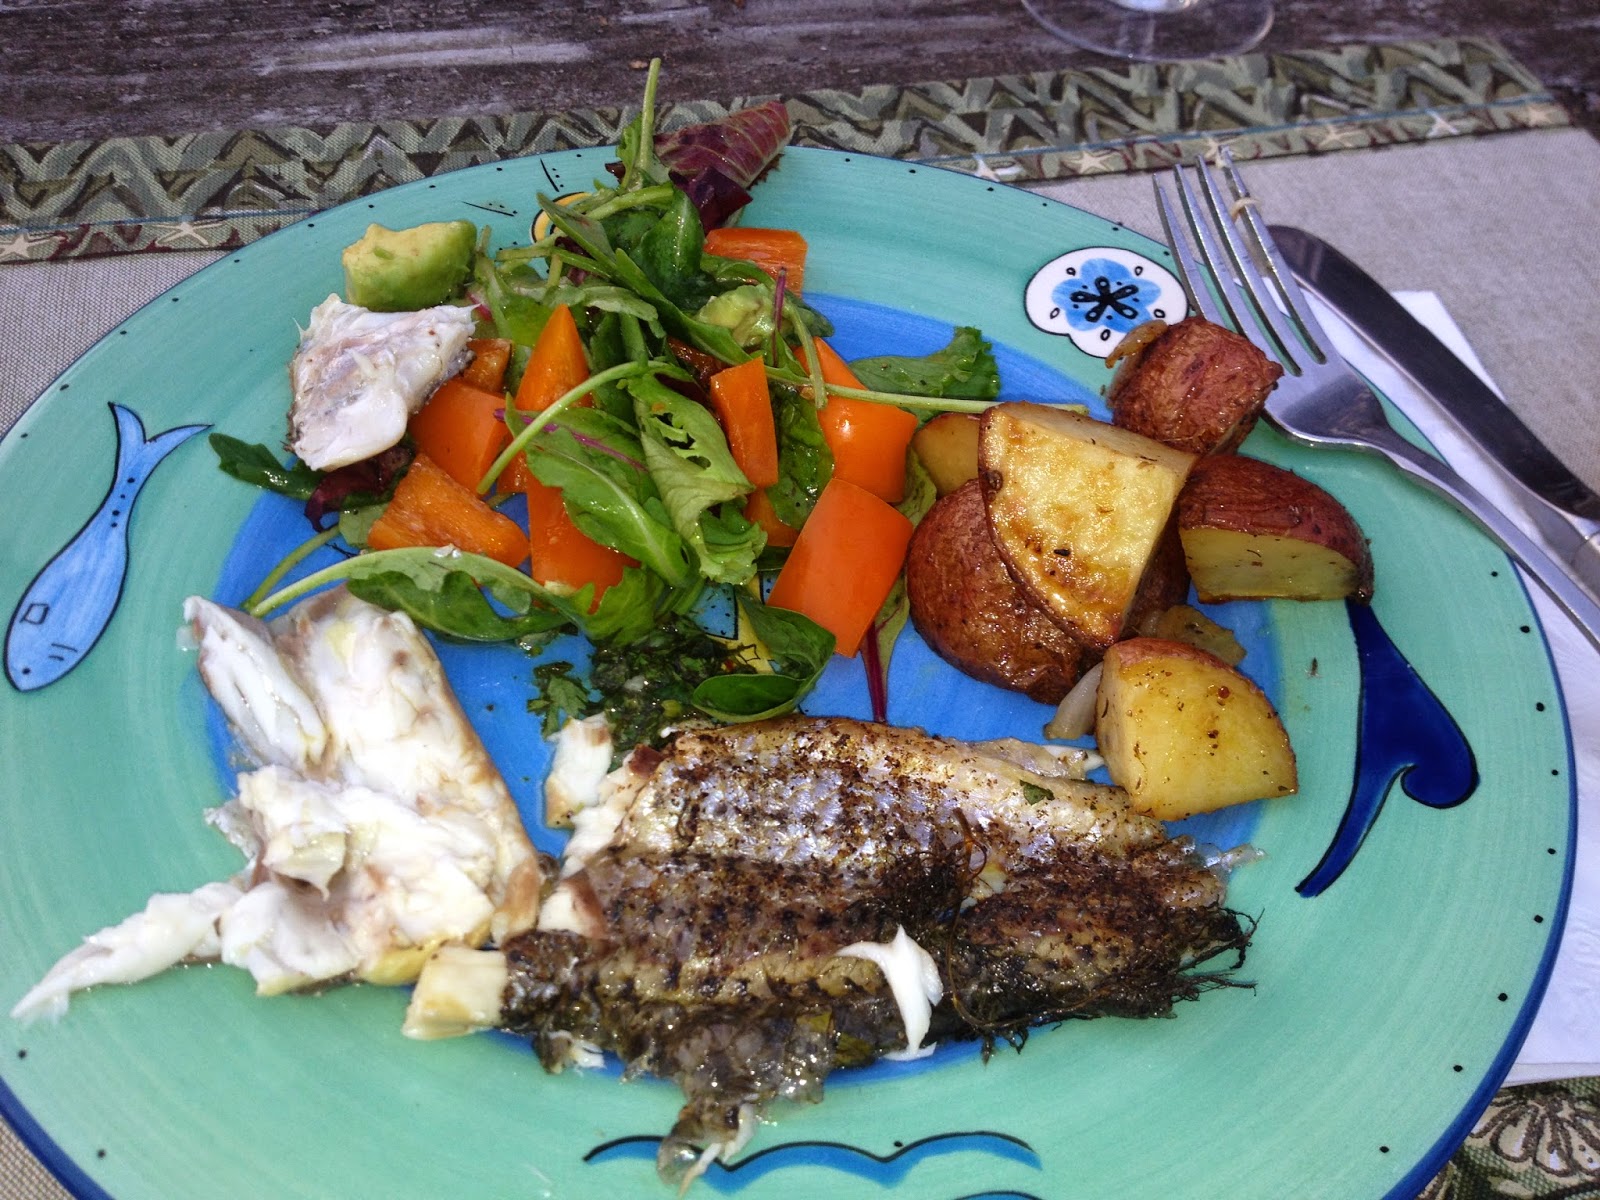
Whole Oven Roasted Rockfish

On this very cold day, I wanted to head to the vault and bring back a little taste of summer. The Thomas family made our annual trek to Chestertown, MD last week and it was our wildest fishing year to-date. Usually we are catching little perch and anything in the less than 1/2 lb. range like CRAZY! Tons of little guys off the deck and then maybe a few 3-4 lb. catfish. Lots of fun and nice and easy. This year, the evenings were brining a strong wind from the south and a perfect balance of the tides bringing all kinds of bigger fish our way.  We caught a bunch of really beautiful rockfish, which are also known as striped bass.  They are a classic Maryland and Chesapeake fish and it was very exciting to be catching them late into the evenings.  We also hooked a 40lb. skate and my dad and mom put on a master class on pulling it in on a 10 lb. line.  It was seriously amazing stuff.  I capped off my week with a 5 lb. rockfish that I cleaned and gutted - under the extremely watchful eye of my dad - and then cooked up for my parents, Mark, and my aunt and uncle.  It was the perfect night out on the dock, beautiful sunset, and a delicious fish. To the fish!
Whole Oven Roasted Rockfish serves 6-8 people
1 5 lb. Whole Rockfish (scaled and gutted)
1 bunch dill
1 bunch parsley
2 lemons
1 small onion
2 Tbs. olive oil
2 tsp. salt
1 tsp. pepper

Me and my beauty!
In our house, if you want to keep it, you have to clean it yourself.
1.  When you buy a whole fish, you can ask them to scale and gut the fish.  I like to leave the head on for more flavor and the beautiful presentation. Snip the funs and tail and line a pan with foil. You want to thoroughly was the fish with cold water and pat dry with a paper towel.
2.  Prepare all of your ingredients, slice the onion and the lemon into circles and wash and dry the herbs.
3.  Score the skin by making vertical slices on each side.  This will help the fish cook more evenly.  Rub the fish inside and out with olive oil and then sprinkle generously with the salt and pepper.
4.  Spread out all of the onion, a few lemon slices and half of the herbs on the bottom of your pan and place the fish on top.  Place 4-5 pieces of lemon inside the fish cavity and then place the remaining pieces of lemon and the rest of the herbs on top.
5.  Cover tightly with foil and bake in a 375 degree oven for 35 minutes.  Remove pan from the oven and carefully remove the foil - hot steam will be coming out.  Put the uncovered fish back in the oven for another 10-15 minutes to get a crispy skin.
6.  The fish is cooked when it is opaque, but will still be very tender and juicy.  Cooking the fish on the bone and in the skin adds lots of flavor and also makes this dish much more forgiving as far as cooking time because the fish is less likely to dry out.
7.  We served with roasted potatoes and a fresh garden salad.
And the beautiful sunset and company didn't hurt.
 

Wednesday, July 2, 2014

Fruity Yogurt Bomb Pops

These are the perfect dessert or little afternoon treat for summer and even more perfect for the 4th of July. They are a great balance of the sweetness from the fruit and the tart, but creamy yogurt.  On top of being delicious, they are also really healthy so you can feel good about eating more than one!  Or feeding them to your littlest party guests.  Making them is also very easy, just blending together fruit, sugar, and plain yogurt.  As far as the molds...I am not proud of this, but I do not own popsicle molds.  I have a tiny kitchen and they just haven't made the cut.  I do have mini cupcake pans, though.  And they worked out perfectly.  I actually placed a regular sized cupcake liner into my mini cupcake pans to create a big of a cylindrical mold for my pops.  Not very sturdy or perfect, but they absolutely did the trick.  What I loved most was that the liners have the texture that mimics a real Bomb Pop.  We eat with our eyes too, so I still wanted them to look semi-decent, which I think they did.
Fruity Yogurt Bomb Pops (makes about 12 1/4-cup sized pops)
Ingredients:
2-1/3 cups plain Greek Yogurt
2 Tbs. milk
2/3 cup blueberries
2/3 cup chopped strawberries
1 lemon
1/2 cup powdered sugar (divided)
red and blue food coloring (optional)

1. Start with three bowls:  one with blueberries, one with your chopped strawberries and one with the 2-1/3 cups of plain yogurt. Add 1 Tbs. sugar to the strawberries and stir through.  Add 1 Tbs. sugar to the blueberries and mash up a bit with the spoon to release the juices.  Add 2 Tbs. of sugar and 2 Tbs. milk to the plain yogurt and stir through.
 2.  Allow the fruit to sit and absorb the sugar for about 10 minutes.
 3.  Prepare your cupcake tins or your popsicle molds.
 4.  Using a blender, blend the blueberries with 2/3 cup of the yogurt and add a few drops of blue food coloring (if you want).   Do the same with the strawberries and another 2/3 cup yogurt and red food coloring.
5.  Add the juice and zest of one lemon to the remaining 1 cup of yogurt along with another 1 Tbs. sugar.
 6.  Now you are ready to assemble.  Add the blueberry first and freeze for 5-10 minutes so that it really sets and your colors won't run together.
 7.  Follow the same for the lemon and then the strawberry layers.  Once you add the strawberry, also stick in your popsicle sticks.
 8.  Allow to freeze 3-4 hours or overnight.
 9.  Remove the foil wrap when you are ready to eat.
 These would be great for cheering on Team USA as they did a stellar job representing for our country at the World Cup!
 Or just for breakfast on your way to work.

One Year Ago: Salmon Sliders
Two Years Ago: Strawberry Pecan Salad
Three Years Ago: Pickles in a Barrel
Four Years Ago: Pulled Pork Sandwiches with Peach Habanero Sauce

Monday, June 30, 2014

Eating at the World Cup - Manaus Part One

One major highlight of our trip to Brazil was a little 1,800 mile jaunt into the Amazon Jungle to the city of Manaus.  There are no roads into Manaus and the city is accessible only by plane and riverboat.  We opted for the plane and when we were descending into the Amazon, we really get a sense just how massive the jungle and the river really are.  Obviously I KNOW that they are huge, but the decent into the city leaves no doubt that this is truly one of the wonders of the world.
On our first night in Manaus, we went to the delicious and highly recommended Restaurant Banziero.  Under the direction of award winning local chef, Felipe Schaedler, we enjoyed one of our favorite meals in Brazil.  Being so deep in the jungle, Manaus is known for the amazing local fish, fruits, and vegetables that are nearly impossible to export.  I knew we were in for a very local treat that we would never be able to get anywhere else in the world.When you first arrive in many restaurants in Brazil, you receive a small mug or cup of Caldinho.  It is a thick soup or broth that is either made with black beans or with some kind of seafood.  We'd already come to love caldinhos, so we knew we were in love when they immediately brought the steaming mug to our table.  This version was a thick seafood soup made with tucupi, jambu and fresh shrimp.  Tucupi is a yellow sauce that is extracted from wild manioc root that grows in the Amazon Jungle and the jambu is a local fruit.  This dish was perfectly seasoned and absolutely hit the spot after a long day of travel.  
They also brought some limes and homemade spicy pepper sauce to accompany the caldinho so that you could adjust the acidity and spice to your own preference.
Obviously the first thing we did after chugging our caldinhos was order the national drink of Brazil: Caipirinhas.  If your country is going to have a national drink, it should always be as good as this.  Fresh lime, sugar, and locally made sugar cane liquor.  Muddled together simply and perfectly to create a balanced and delicious drink.  At Banzeiro we got a version with kiwi fruit and we were not disappointed.
Kelaine opted for the fantastic graviola juice, which we all loved.
Since we'd eaten a lot of fried foods already, our bodies were craving something fresh.  We started our with the Salada do Banzeiro (House Salad), which was a mix of fresh lettuce, tomatoes, local cheese, croutons and bacon made from the pirarucu fish.
No, you didn't read that wrong.  I said BACON made from FISH.  And it was sensational.  Pirarucu is the most famous of the local Amazonian fishes that we knew we wanted to try and this preparation was salty and delicious.  It is a very large, thick fish, so this very fun take worked very well.
Next we ordered the house specialty, which was Costela De Tambaqui Frita, or Fried Tambaqui Ribs.  This is another gigantic fish that actually has huge ribs that they fry up and serve on the bone.  The meat is white, tender, and flaky.  I've never seen or tasted anything quite like it before.
It was incredibly unique and delicious.
As our second mail course (because...why not?), we had Pirarucu with roasted banana and fried cheese.  It's hard to tell from the picture, but this is a huge filet of firm, moist fish that has been barbequed on an open flame.  They then bring it out on a cutting board to the table and serve it to each person with a little piece of the cheese and banana.  Not only was it beautiful, but it was the most delicious thing I've eaten in quite a while.
We also had white rice with broccoli, which was a very common side dish throughout Brazil along with black eyed peas and potatoes.  The sandy-looking stuff is farofa, which is a grain that you'll find as an accompaniment to most meals.  It adds crunchy texture to the food. 
For dessert, we split the Cupuaçu mousse with toasted cashews. Cupuaçu is a local Amazonian fruit that is very unique. The taste is somewhere between a banana, pineapple, and chocolate (it is actually in the cocoa family).  We also got a little coconut candy to finish off the meal.  The mousse was delicate and not too sweet with a perfect crunch from the nuts.
Mark was not a huge fan which worked out great...more for me!
This meal left us totally fortified and excited to cheer on Team USA in their match against Portugal. Even a gut wrenching tie couldn't dampen our love for the great city of Manaus. 
Up next is our trip to the jungle!

One Year AgoCoca Cola Chicken Thighs
Two Years AgoChocolate Chip Zucchini Bread
Three Years AgoKiwi Margarita
Four Years AgoLamb Kebabs